

Introduction
The turbocharger is a very sensitive device; It must be treated with caution. It is very important to know the detailed step by step, to disassemble and in this article we will discuss some safety measures that must be taken before and during the dismantling process.
A turbocharger has a turbine on one side and a compressor on the other. The disassembly should always keep the compressor side beginning to measure the critical clearance between the mounting of the cover on the compressor side and the compressor side tree. This is a very important area that needs to be met and must be supported as he left.
THE MAKER’S MANUAL MUST BE READ AND UNDERSTOOD BEFORE ANY WORK IS UNDERTAKEN ON ANY MACHINERY.
Safety while Dismantling the Turbocharger
Inform the operating personnel accordingly before starting any maintenance work on turbocharger.As a precaution, place a receptacle for leaking oil under the turbocharger.
Before starting work, secure the rotor against turning.
Ensure that absorbent material is available to soak up any spilled oil.
Ensure that operation and process materials are drained, collected, and disposed of in a safe manner.
Ensure that all spares and tools are available for dismantling and assembling.
Dismantled safety devices must be reassembled and subjected to a functional test immediately after conclusion of maintenance and repair.
Turbocharger Overhauling

Tools Required for Dismantling
Open and ring spannerBox spanner
Claw spanner
Tommy spanner
Bearing pushing tool
Bearing pulling tool
Pump disc locking plate
Pump removing tool set (provided by manufacturer)
Impeller removing tool set (provided by manufacturer )
Shaft pushing tool
Clearance measuring instruments
Screw driver
Preliminaries before Dismantling:
Before dismantling, exhaust gas from the turbine should be bypassed and a blanking plate should be fitted in turbine inlet casing.Drain the lube oil from the built-in sump.
Remove the turbine side cooling water connection and drain all water
Turbocharger Sectional View
 |
| Image credit:www.auto-innovations.com |
Turbine and Impeller
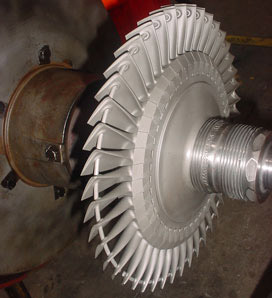 |
| Image credit: www.romaga.com |

Turbocharger Dismantling Procedure
Compressor Side Removal:Dismantling should always be started from the compressor side.
1) First remove the filter silencer assembly or compressor inlet casing from position.
2) Remove the compressor end cover and drain plug on the compressor side.
3) Remove the suction cover and measure the critical clearance .It is the distance between the compressor end cover mounting face and shaft end .Mark it as K.
4) Pull the rotor shaft towards the compressor side until the impeller comes in contact with the insert and determine K2.
1. Impeller clearance L = K - K2
5) Thrust the rotor shaft towards the turbine side until the turbine disc and nozzle ring comes in contact with each other and measure K1
2. Disc clearance M = K1 - K
6) The above measured clearance is very important as this will determine the proper functioning of the labyrinth seal between the impeller and exhaust shield and also the alignment of the shaft.
7) Remove the lube oil pump assembly after removing the pump locking plate.
8) Remove the bearing nut and bearing nut washer.
9) Fix the bearing pulling tool in position and slowly tighten it. This will pull the ball bearing assembly out. Care should be taken while removing bearing to avoid any damage to the bearing and rotor shaft end threads.
10) Mark the position of the bearing in position to put it back as it is while assembling.
11) The ball bearing assembly should not be disturbed in any case. If it is damaged, the whole assembly should be replaced with the manufacturer's new part.
12) Now remove the compressor outlet casing with diffuser.
13) Remove the impeller nut and impeller washer.
14) Remove the impeller and inducer from position.
Turbocharger turbine side dismantling procedure for overhauling,for repairing damaged turbine blades, for cleaning cooling water spaces is detailed in the second page of the article "Overhaul and Repair of a Marine Turbocharger."
Turbine Side Removal
1) Remove the turbine end cover with sight glass on the turbine side.
2) Measure the clearance between the turbine end cover mounting face and shaft end.
3) Check the axial deflection of the pump disc cover. The permissible axial deflection of the pump cover is 0.05 mm.
4) Check the rotor shaft by turning by hand.
5) Remove the pump disc locking plate.
6) Loosen the lube oil disc cover and pump washer on the lube oil pump disc by removing the bolt.
7) Remove the outer shaft end nut and tab washer and then remove inner shaft end nut.
8) Remove the lube oil disc from position.
9) Loosen the bearing nut and bearing nut washer and remove from place.
10) Fix the bearing pulling tool on a resilient mounting and slowly tighten it, and this will pull the roller bearing on turbine side slowly out.
11) Care should be taken while removing the bearing to avoid damage to the shaft outer end threads and bearing.
12) Do not disturb the bearing assembly as improper bearing position may misalign the rotor shaft.
13) Before removing, put punch mark on the bearing in position so that it can be put back as it is.
14) Remove the turbine inlet casing from the turbine outlet casing.
15) Now the whole rotor shaft can be pulled out from the compressor side. While pulling out the shaft, care must be taken to avoid damage to the turbine blades and labyrinth sealing arrangements on the shaft.
16) Remove tab washer and remove seal plate to the turbine outlet casing.
17) Remove shroud ring and shaft seal from the turbine outlet casing.
18) Remove nozzle ring assembly from the turbine inlet casing.
Finally remove the air seal adjusting screw, anti-corrosion zinc assembly, sand cover, and other various accessories in position
# Various books, study material and other online sources has been refereed prior to writing this article but no part is copied or produced from any of the source but explained same thing in better detailed way.
Author Amit
If you have any problem with the content contact us! we will act ASAP


Post a Comment